Manage Saved Job Postings Fast: A Job Seeker's 3 Step Weekly Plan
To manage saved job postings well, check each platform’s Saved or My Jobs view weekly, sort entries into a simple stage system (Researching, Ready to Apply, Applied, Interviewing, Archived), turn on job alerts, and pull everything into one central tracker. That last step is where most job searches fall apart. Fifty saved listings spread across three platforms isn’t a plan; it’s clutter.
TL;DR:
- Most job platforms use similar save icons and dashboards, but mastering the specific navigation paths reduces wasted time searching for saved listings.
- Organizing saved jobs into distinct stages like researching, ready to apply, applied, interviewing, and archived streamlines follow-up and prevents clutter.
- Applying a weekly routine of triage, focused application sessions, and cleanup helps maintain a manageable, actionable job search pipeline.
- Using a centralized job tracker that integrates notes, tailored resumes, and follow-up reminders improves management across multiple platforms.
- Saving jobs is only effective when combined with consistent review and prompt action, as expired or stale listings quickly lose value.
Table of Contents
- How Do You Manage Saved Job Postings on Each Platform?
- How Should You Organize Saved Jobs So the List Stays Usable?
- Updating Status: Moving Jobs From Saved to Applied to Interviewing
- What To Do When Saved Jobs Won’t Sync or Go Missing
- What’s a Realistic Weekly Routine for Managing Saved Jobs?
- Centralizing Everything: Where a Job Tracker Fits This Workflow
- An Editorial Take on Saved Job Chaos
- Keep Every Saved Job Moving With EasyCV
- Where to Go Deeper on This Topic
- Sources
How Do You Manage Saved Job Postings on Each Platform?
Every major job platform lets you save a listing, but the path back to it isn’t identical. Knowing the exact clicks saves you from digging through a feed you’ve already scrolled past twice.
On LinkedIn, saved jobs live under Jobs → My Jobs → Saved. On mobile, the path is nearly the same, though the layout compresses the filters into a dropdown instead of a sidebar. Once you’re viewing a saved job, the More icon (three dots) gives you options to apply directly or remove the listing from your saved list, according to LinkedIn’s official help documentation.
On Indeed, sign in and go to My Jobs, where Saved, Applied, and Archived appear as separate tabs. You save a listing by clicking the flag icon on any job card. Moving a job from Saved to Applied happens through the three-dot menu on that listing, and Indeed’s career advice team notes that this small action keeps your active pipeline separate from jobs you’re still weighing. One detail worth knowing: Indeed’s own support documentation states that jobs older than six months may drop off your active saved list automatically, so don’t assume a saved posting stays put forever.
On Handshake, popular with students and recent grads, you save a role by tapping the bookmark icon on any listing. Saved jobs collect under the Saved tab on the Jobs page, and Handshake’s support center confirms the platform sends notifications when a saved job is closing soon or has been updated by the employer.
Other boards mostly follow the same pattern:
- A bookmark or flag icon to save a listing
- A dashboard or “My Jobs” area to review saved items
- Some form of status tag (saved, applied, or expired)
Learn the pattern once, and you can navigate almost any board within a few clicks.
How Should You Organize Saved Jobs So the List Stays Usable?
A saved-jobs folder with many entries isn’t organized. It’s a backlog you’re afraid to open. Independent reporting on job search habits points to a lightweight stage system as the fix, and it’s the same structure recruiters use internally, just simplified:
- Researching — you saved it but haven’t verified fit or requirements yet.
- Ready to Apply — you’ve confirmed it’s worth your time and know what tailoring the resume needs.
- Applied — submitted, with a date and follow-up reminder attached.
- Interviewing — active conversation, notes on interviewer names and questions asked.
- Archived — closed, rejected, or no longer relevant.
Attach three pieces of information to each saved job, no more: the application deadline, one sentence on why it’s a fit, and what needs to change on your resume before you apply. That’s it. Anything more elaborate turns into busywork you’ll abandon by week two.
Where a platform’s built-in folders or labels support this (LinkedIn’s saved list, Indeed’s tabs), use them directly. Where they don’t, a plain spreadsheet or a dedicated job tracker fills the gap, especially once you’re juggling more than one platform.

Cap your active “Researching” and “Ready to Apply” stages at a manageable number of listings combined. Beyond that, you’re hoarding, not searching. Prune weekly: archive anything past its deadline or gone stale.
Pro Tip: Set a recurring 10-minute calendar block every Sunday just to delete saved jobs that expired or no longer fit. A shorter list is easier to act on than a longer one.
Updating Status: Moving Jobs From Saved to Applied to Interviewing
Saving a job and applying to it are two different actions, and platforms treat them that way. On LinkedIn, once you’ve submitted an application through the platform, it typically shifts out of your Saved list and into your applied history automatically. On Indeed, you move a listing from Saved to Applied yourself using the three-dot menu, which keeps your active pipeline honest instead of bloated with jobs you already submitted for.
The moment you apply, record three things before you forget them:
- The exact date you applied
- Which version of your resume you sent (tailoring matters, and you’ll forget which one if you don’t note it)
- A follow-up date, typically one to two weeks out
If you’re consolidating an old spreadsheet or a messy Notes app list into a real tracker, export what you have as a CSV first. Most trackers accept a basic import, so you’re not retyping months of history by hand.
What To Do When Saved Jobs Won’t Sync or Go Missing
A saved job that vanishes is almost never a mystery. It’s usually one of three things: you’re logged into a different account, the posting expired, or the employer pulled it down.
Start with the basics:
- Confirm you’re signed into the same account and email you used to save it originally.
- Try a different device. If the job shows up on desktop but not mobile, it’s a sync lag, not a lost save.
- Check whether the original posting still exists by searching the company name and title directly.
If it’s still missing, work through the standard device fixes: force-close and reopen the app, clear the browser cache or cookies, update the app to the latest version, and log out and back in. Desktop-versus-mobile discrepancies resolve themselves more often than you’d expect simply by switching devices.
Indeed’s own documentation is direct about one cause behind “disappearing” saves: postings older than roughly six months can be automatically removed from your active saved list, even if you never touched them. If a job is truly gone, don’t waste time hunting. Search by company and title, or check if you had saved the URL somewhere else, and move on.
What’s a Realistic Weekly Routine for Managing Saved Jobs?
A search built on random, whenever-you-feel-like-it checking produces exactly what you’d expect: missed deadlines and a saved list nobody trusts. A short, repeatable cadence beats sporadic effort, and the habit itself matters more than any tagging system you build around it, according to job search reporting on saved-list management.
Try this three-step weekly structure:
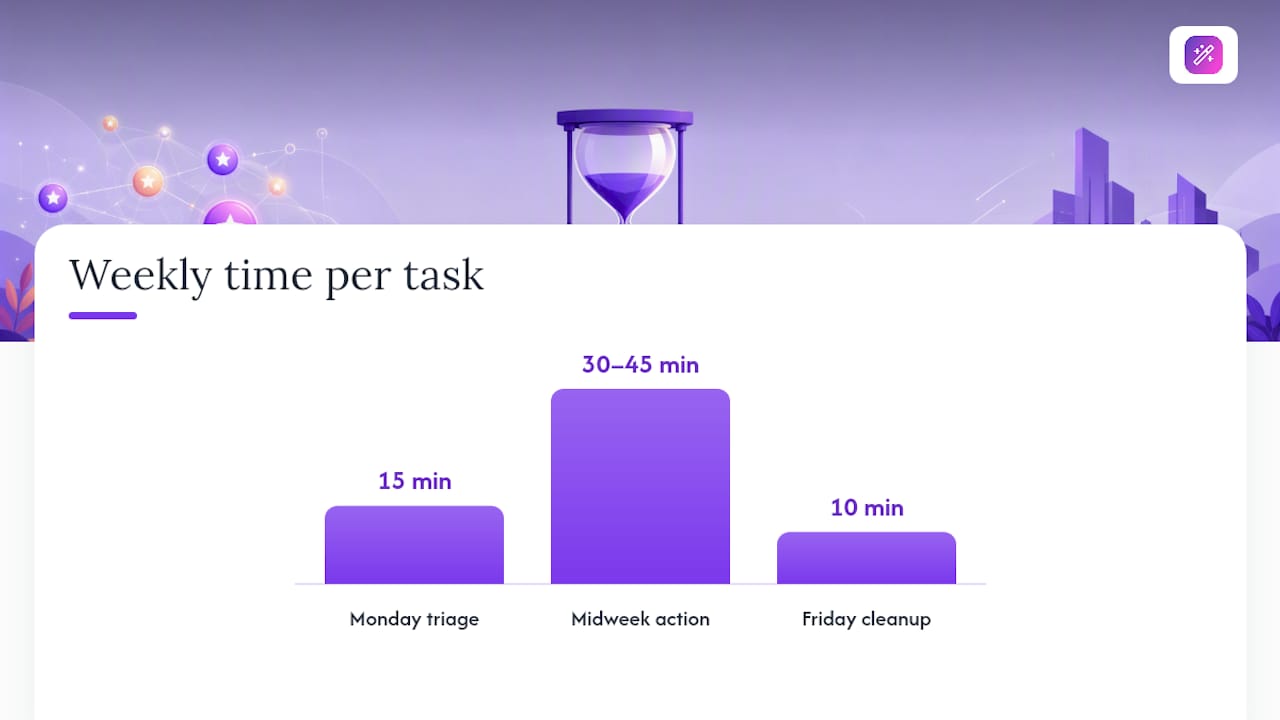
- Monday triage (15 minutes). Review everything saved since your last check. Move clear non-fits to Archived immediately. Tag anything promising as Ready to Apply.
- Midweek action (30 to 45 minutes). Submit applications for your top picks. Three focused, tailored applications beat fifteen generic ones.
- Friday cleanup (10 minutes). Archive expired postings, update follow-up dates for anything you applied to earlier in the week, and note upcoming deadlines for next week.
For prioritization, use a simple order: deadlines first, best-fit roles second, anything that came through a networking lead third. Pick one to three jobs to apply to each week rather than trying to blitz your entire saved list at once. Quality of application beats volume almost every time.
Turn on job alerts for your target titles and locations so new postings land in your inbox instead of requiring manual searches. Applying within the first day or two of a posting going live tends to put you ahead of the queue, since many employers start screening before the listing closes.
Centralizing Everything: Where a Job Tracker Fits This Workflow
Once you’re saving jobs across three or four platforms, the real problem isn’t finding listings. It’s remembering which resume version you sent where and whether you already followed up.
A dedicated job tracker solves that by giving every saved posting one home regardless of where it came from. The EasyCV Job Tracker works this way: you move a job through the same Researching to Archived stages covered earlier, but each entry can carry its own tailored resume and cover letter attached directly to it, plus a follow-up reminder so nothing slips.
A practical sequence looks like this:
- Record a saved posting in the tracker (title, company, link, deadline).
- Generate a tailored resume for that specific listing using an AI writing assistant.
- Set the status to Applied and attach a follow-up date.
- Move it to Interviewing once you hear back, and log interview notes right there instead of in a separate document.
This mirrors what developer-focused tracking tools already do under the hood. Open-source projects like jobseek auto-detect job pages and pre-fill company and title data, using URL matching to avoid saving duplicates. A consumer-facing tracker aims for that same outcome without requiring you to write any code.
EasyCV’s free plan covers the basic tracker functions; premium tiers unlock unlimited exports and the Job Matcher, which pre-scores new listings against your resume through a swipe-based interface, so you spend less time deciding what’s worth saving in the first place.
Pro Tip: Before you consolidate old saved jobs into a new tracker, export or screenshot anything with an approaching deadline first. Migrations occasionally take a day to fully sync, and you don’t want to lose track of a job that closes tomorrow.
An Editorial Take on Saved Job Chaos
Most job seekers treat saving a job like bookmarking a recipe they’ll “get to eventually.” The problem is that job postings have expiration dates and recipes don’t. What separates people who land interviews from people who accumulate 60 stale saved listings usually isn’t effort. It’s the habit of a weekly review paired with applying fast once something fits, because early applicants routinely get more attention before a hiring manager’s inbox floods.
The stage system in this piece isn’t complicated by design. Complicated systems get abandoned. Simple ones survive a bad week.
— Andras
Keep Every Saved Job Moving With EasyCV
Spreadsheets and browser bookmarks work until you’re managing four platforms at once, and that’s exactly where most saved-job systems break down. EasyCV gives you one dashboard for the entire process instead of juggling tabs: the Job Tracker holds every saved posting and its stage, the Job Matcher swipes you through pre-scored roles so you’re not manually sorting fits, and the AI resume and cover letter generator produces a tailored version for each application without starting from scratch every time.
Getting started takes a few minutes. Sign up, save or import your first posting, generate a tailored CV for it, and set the status along with a follow-up reminder. The free plan covers the core tracker and builder; premium unlocks unlimited exports, the full Job Matcher, and AI headshot generation for your profile photo. Check the full breakdown on the EasyCV features page, or if you’re applying internationally, the CV Translator adapts your documents across 30-plus languages without breaking formatting. Start at Easy-cv and see how quickly a scattered saved-jobs list turns into an actual pipeline.
Where to Go Deeper on This Topic
- Manage jobs you saved on LinkedIn | LinkedIn Help
- My Saved Jobs in Handshake | Handshake Support
- Job Search Organization Tools: Your 2026 Guide | NueCareer
Sources
- Manage jobs you saved on LinkedIn | LinkedIn Help
- How To Find Current Saved Jobs In Indeed (Plus Tips)
- My Saved Jobs in Handshake